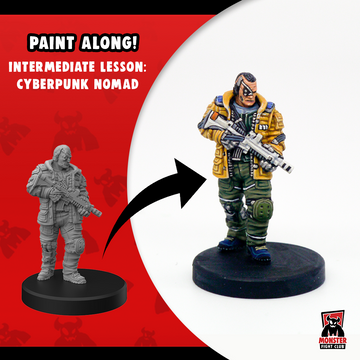
Guide to Painting the Cyberpunk Red: Combat Zone Tough-As-Nails Nomad

Materials Needed:
- Cyberpunk Red: Combat Zone Tough-As-Nails Nomad Mini Figurine (Edgerunners 2 starter gang box) (You might also know him as Gaze from the Danger Gal Dossier)
- Paint brushes (varying sizes)
- Acrylic paints (assorted colors from Vallejo)
- Palette or disposable surface for mixing paints
- Water cup for rinsing brushes
- Paper towels for drying brushes and blotting excess paint


Step 1: Prepare Your Workspace
Before you begin painting, set up a clean and well-lit workspace. Lay out all your materials and ensure your figurine is clean and free from dust or debris. This will ensure a smooth painting process.
Step 2: Prime the Figurine
Using a primer specifically designed for miniatures, apply a thin, even coat to the entire surface of the figurine. This will help the paint adhere better and provide a smooth base for painting.

Step 3: Base Coat
Start by applying the base colors to your figurine. Refer to your reference images to determine the appropriate colors for each section of the figurine. Use thin layers of paint and allow each layer to dry completely before applying the next one.


Step 4: Layering
Once the base coat is dry, add depth and dimension to your figurine by layering different paint shades. Use a lighter shade to highlight raised areas and a darker shade to add shadows and definitions. Blend the colors seamlessly for a realistic effect.


Step 5: Detailing
Now, it's time to add intricate details to your figurine. Use a fine-tipped brush and steady hand to paint smaller features such as facial expressions, clothing textures, and accessories. Take your time with this step to ensure precision and accuracy.


Step 6: Weathering and Effects
To give your Cyberpunk Nomad a gritty, futuristic look, consider adding weathering effects such as scratches, dirt, and rust. You can achieve this by lightly dry brushing darker colors onto the surface or using a sponge to dab on paint for a worn-out effect.


Step 7: Final Touches
Once you're satisfied with the overall appearance of your figurine, make any final touch-ups as needed. Check for any missed spots or areas that require additional detailing. Allow the paint to dry completely before handling the figurine.

Step 8: Clean up
Don’t drink the paint water…please don’t do that. ^.~

Step 9: Display Your Masterpiece Congratulations, you've successfully painted your Tough-As-Nails Nomad! Now it's time to proudly display your work or use it in your tabletop gaming adventures.


